Harnessing the power of Embeddings: a real-world example of a watch recommendation app using a vector database.
Learn how to build a real-world watch recommendation application using embeddings and a vector database. This tutorial covers using Postgres with pgvector, Laravel, React, OpenAI, and Groq, deployed on Upsun.
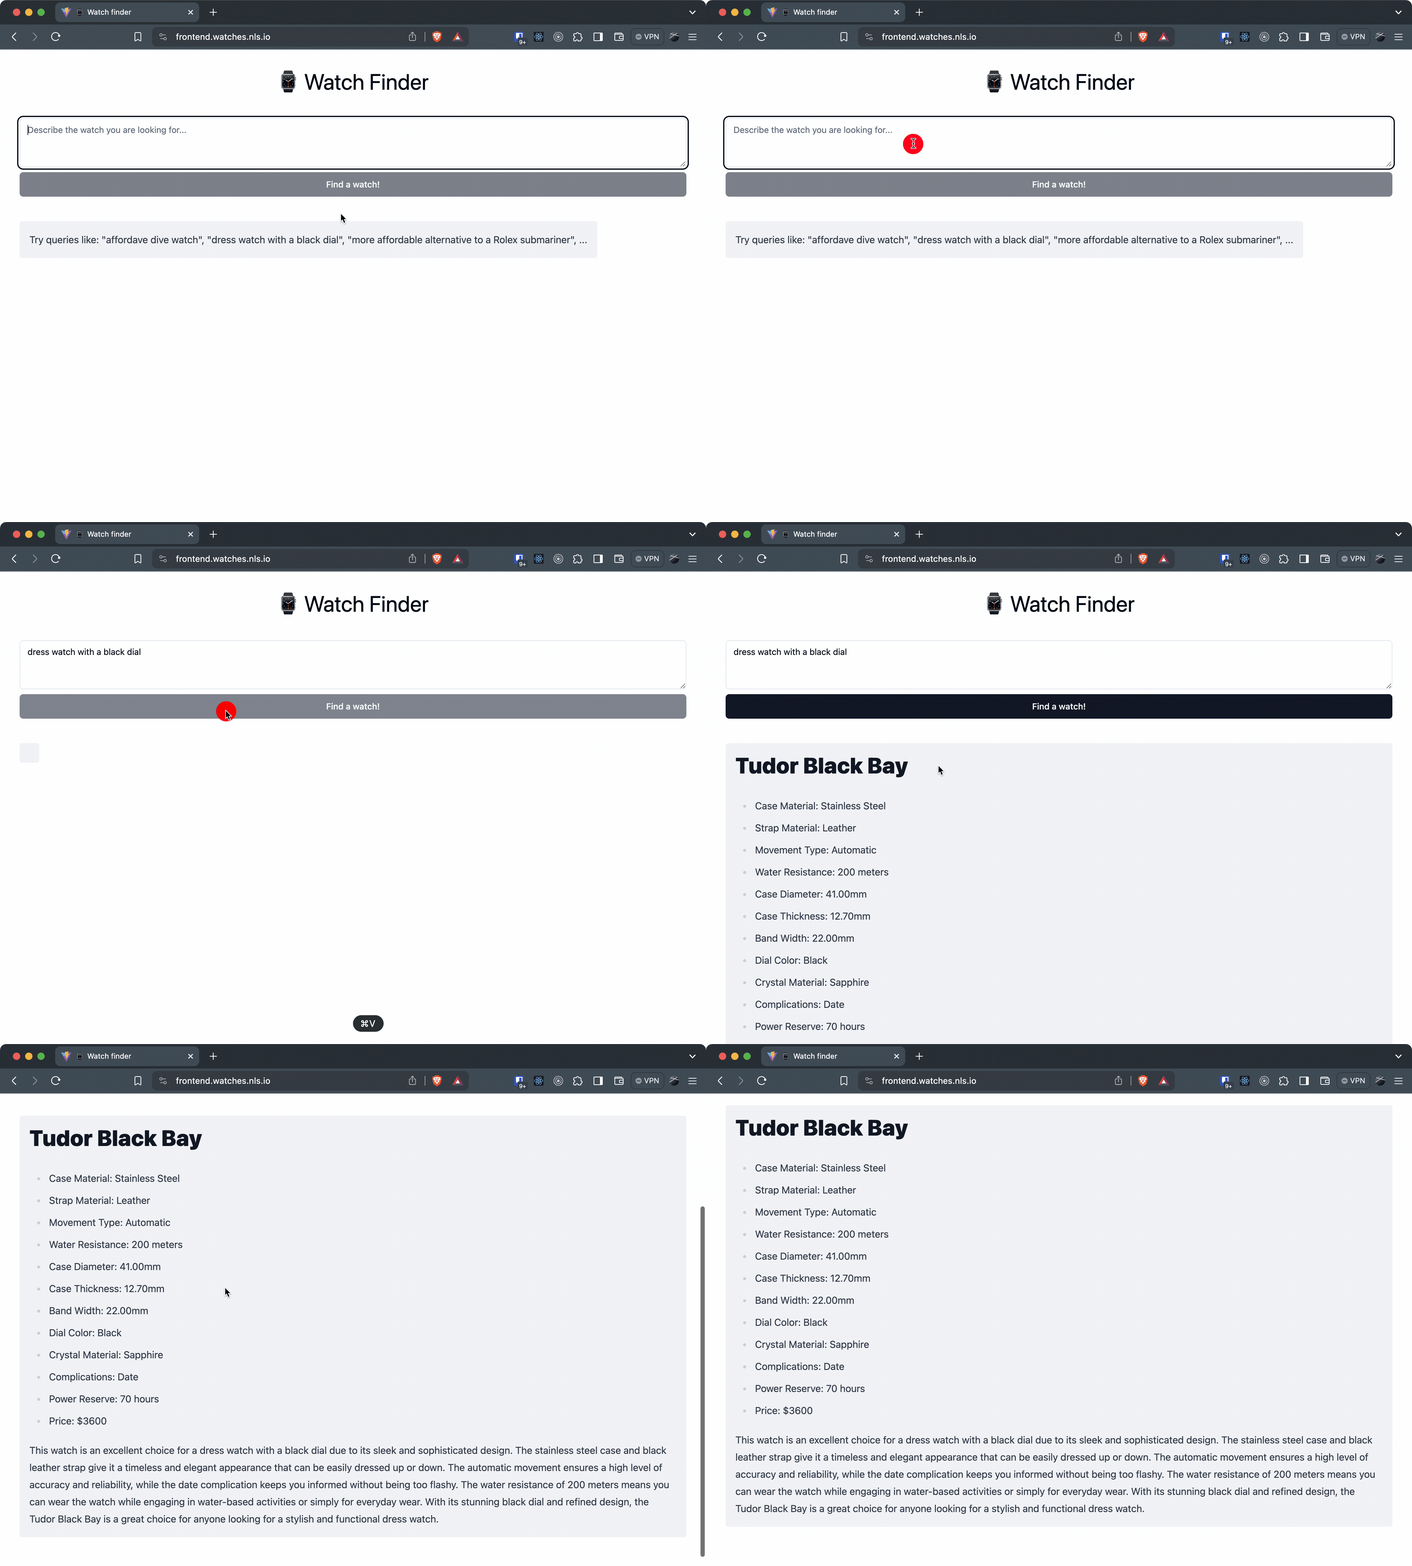
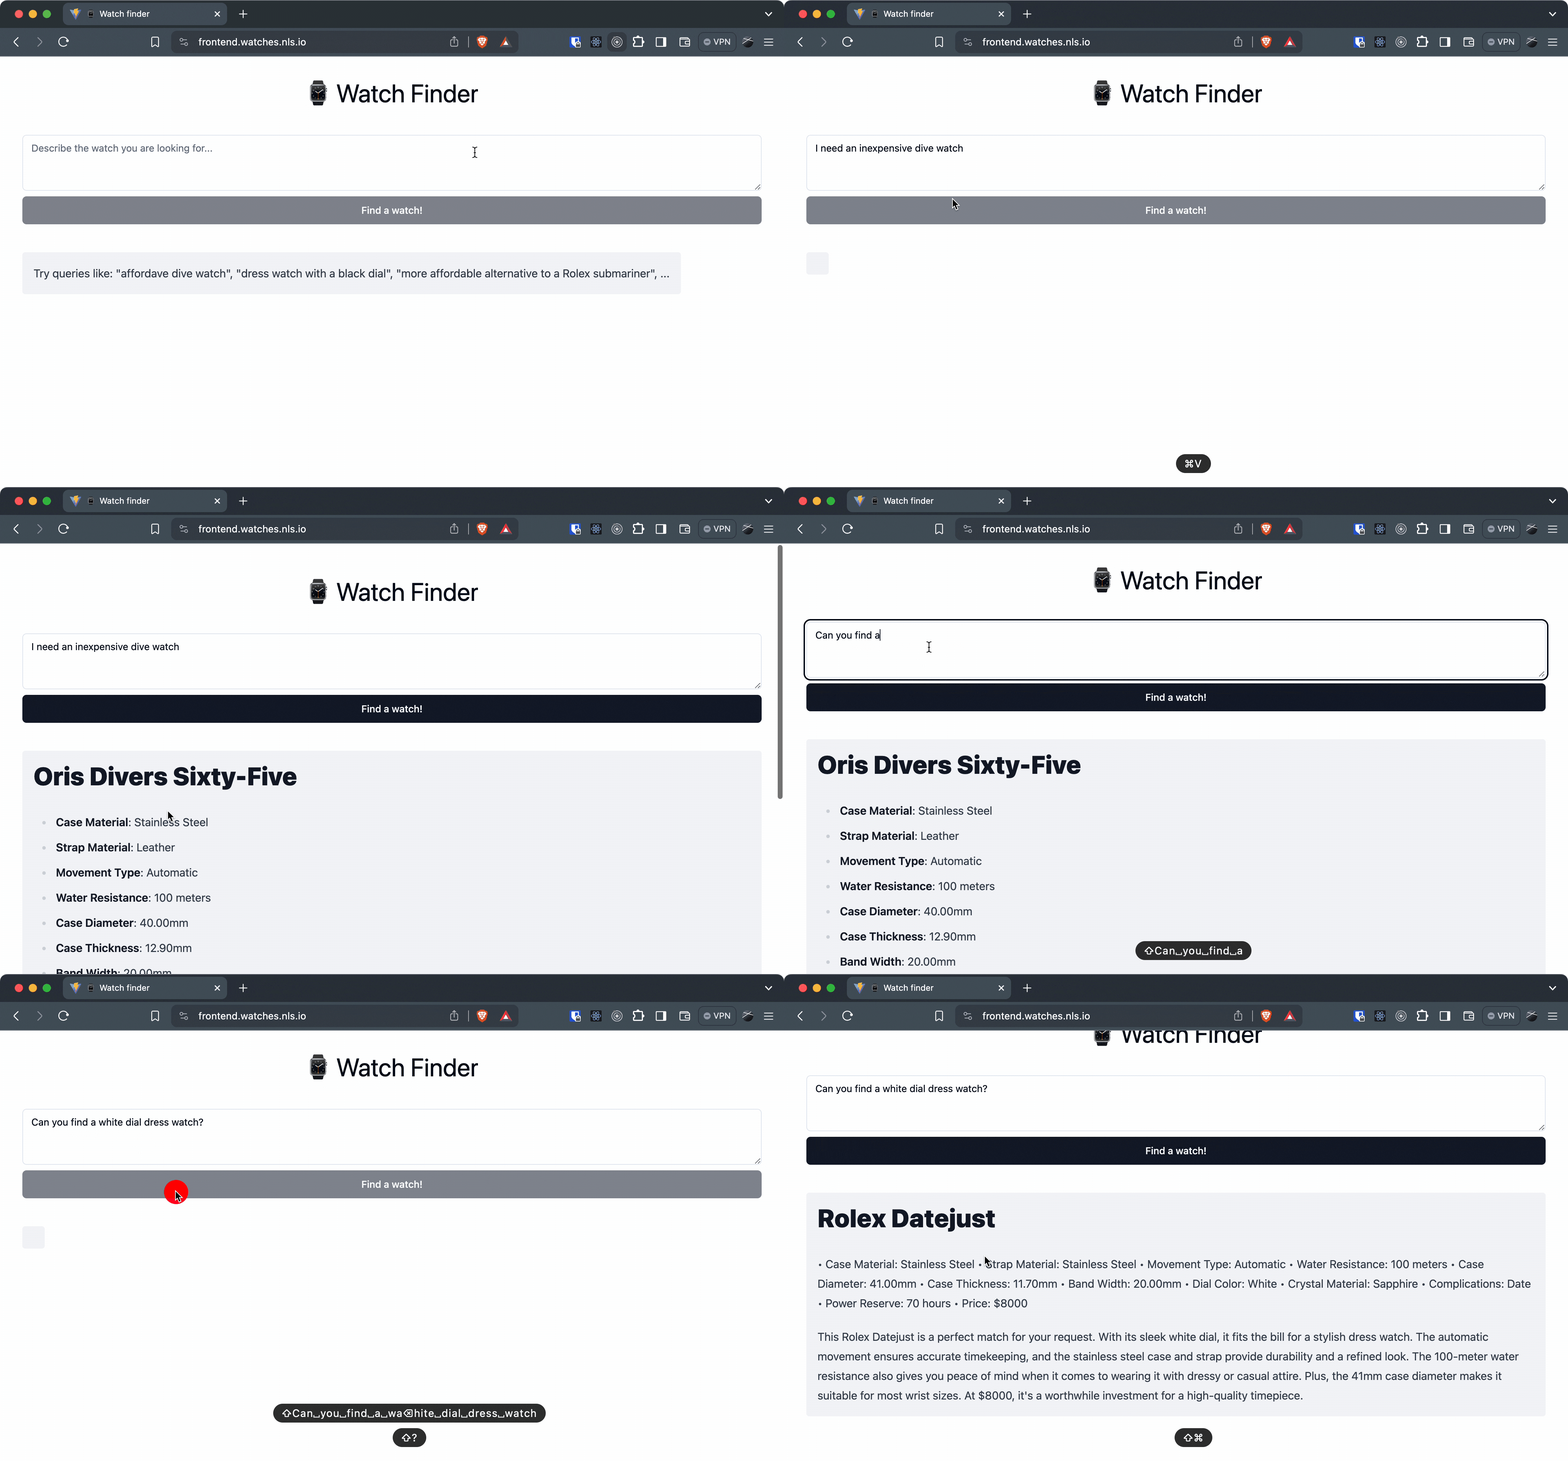
Given the increasing integration of Machine Learning and AI/LLM models in all applications, it is crucial to explore the potential of a robust cloud application platform like Upsun for conducting these experiments.As a watch enthusiast, what would be better than a recommendation engine to find the right watch for you? Here is the app we are going to build from scratch here:
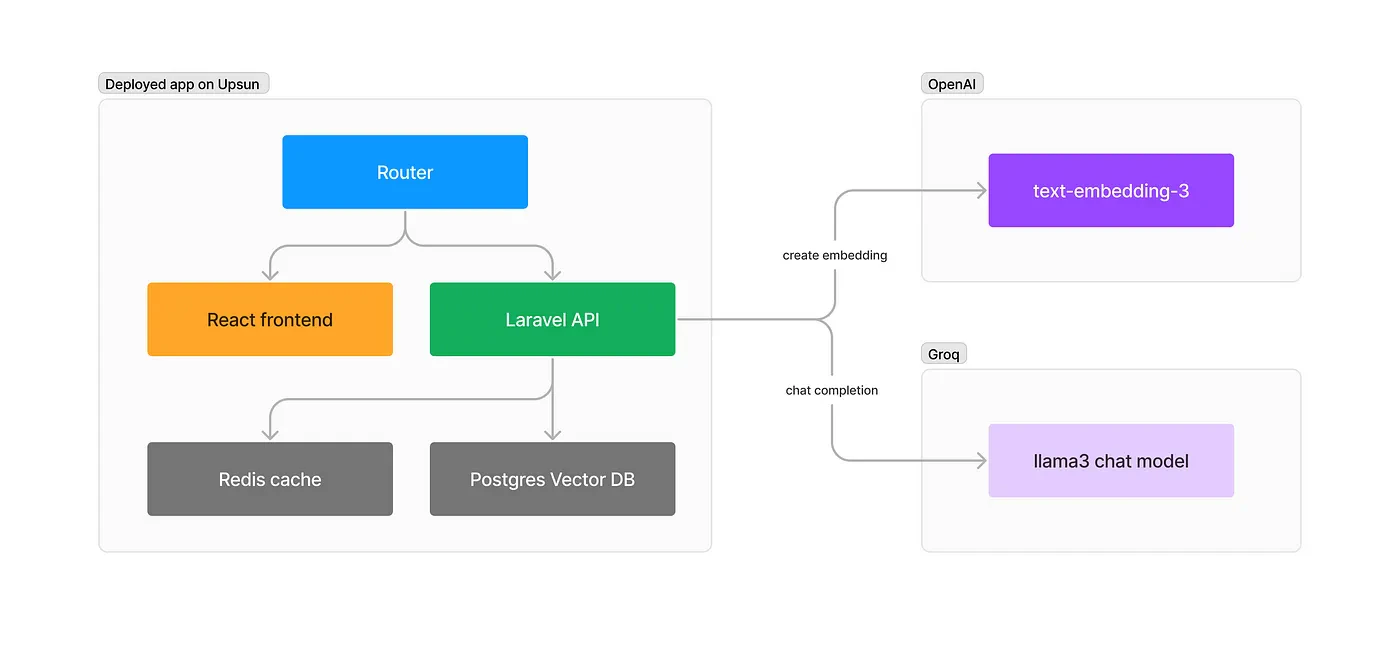
Let’s review the architecture we are going to create and deploy:Our application will be composed of 3 main components:
A static React frontend is used to present the UI to the user.
An API built with Laravel 11 will handle the search requests and populate our database.
A Postgres instance to store our watches records and vectors for the embeddings of our content.
For speed and cost efficiency reasons, we will leverage both OpenAI for creating embeddings and Groq for the LLM part. We will use llama3–8b-8192 as a model on Groq, but mixtral or any other would also work.
You will need php8.x and composer installed locally for this to work. As we deploy our app on Upsun, you can grab the upsun cli by following the steps here.First, create a new folder for your project:
mkdir watches && cd watches
Let’s start by installing Laravel 11 with the API components:
Let’s now create a new React app. We are using Vite here with the react-ts template but feel free to use any other variant. We will set up shacdn/ui for the UI to speed up building our interface.
cd ..npm create vite@latest frontend -- --template react-tscd frontend# Install shacdn/uinpm create vite@latestnpm install -D tailwindcss postcss autoprefixernpx tailwindcss init -p# (so you can import "path" without error)npm i -D @types/node
Add the following code to the tsconfig.json file to resolve paths:
Add the following code to the vite.config.ts so your app can resolve paths without error
// vite.config.tsimport path from "path"import react from "@vitejs/plugin-react"import { defineConfig } from "vite"export default defineConfig({ plugins: [react()], resolve: { alias: { "@": path.resolve(__dirname, "./src"), }, },})
Now run the shacdn init with the following settings:
npx shadcn-ui@latest initWould you like to use TypeScript (recommended)? yesWhich style would you like to use? › DefaultWhich color would you like to use as base color? › SlateWhere is your global CSS file? › › src/index.cssDo you want to use CSS variables for colors? › yesWhere is your tailwind.config.js located? › tailwind.config.jsConfigure the import alias for components: › @/componentsConfigure the import alias for utils: › @/lib/utilsAre you using React Server Components? › no (no)
Setting up our local development environment & infrastructure
While you could use Laravel Sail or any other Docker-based local setup to develop the project, I find relying on the Upsun tethering feature always way quicker. It maps the remote services (database, Redis, etc.) to local ports, so you only need to run the runtimes (PHP, JS, …) locally.To do that, we first need to go through the Upsun configuration. While you can use the upsun ify CLI command to generate an automatic configuration, here is the complete configuration explained. Create a new .upsun/config.yaml and paste the following:
# Routing for the frontend and APIroutes: "https://frontend.{all}/": { type: upstream, upstream: "frontend:http" } "https://api.{all}/": { type: upstream, upstream: "app:http" } "http://{all}/": { type: redirect, to: "https://frontend.{all}/" }services: database: type: postgresql:15 # We will use Postgres with the vector extension configuration: extensions: - vector redis: # Redis is used for the Laravel cache type: redis:7.0applications: # Our react frontend frontend: source: root: "frontend" # folder where the app is type: nodejs:20 build: flavor: none web: locations: "/": root: "dist" # Customize if your build outputs the app somewhere else expires: 1h passthru: "/index.html" commands: start: sleep infinity # needed as we serve static files hooks: # customize if you use another build tool build: | set -x -e npm install npm run build app: source: root: "watches" type: php:8.3 dependencies: php: composer/composer: "^2" runtime: extensions: - apcu - redis - blackfire - ctype - iconv - mbstring - pdo_pgsql - pdo_pgsql - sodium - xsl build: flavor: none web: locations: "/": root: "public" expires: 1h passthru: "/index.php" mounts: # Where Laravel needs write access "/.config": source: "storage" source_path: "config" "bootstrap/cache": source: "storage" source_path: "cache" "storage": source: "storage" source_path: "storage" relationships: # link our services database: "database:postgresql" redis: "redis:redis" hooks: build: | set -eux composer --no-ansi --no-interaction install --no-progress --prefer-dist --optimize-autoloader --no-dev deploy: | # customize if needed but should be ok for Laravel set -eux mkdir -p storage/framework/sessions mkdir -p storage/framework/cache mkdir -p storage/framework/views php artisan migrate --force php artisan optimize:clear
Once done, we must inject some variables into our Laravel app to grab the proper credentials. Create the watches/.environment file with the following:
# Set database environment variablesexport DB_HOST="$DATABASE_HOST"export DB_PORT="$DATABASE_PORT"export DB_PATH="$DATABASE_PATH"export DB_USERNAME="$DATABASE_USERNAME"export DB_PASSWORD="$DATABASE_PASSWORD"export DB_SCHEME="postgresql"export DATABASE_URL="${DB_SCHEME}://${DB_USERNAME}:${DB_PASSWORD}@${DB_HOST}:${DB_PORT}/${DB_PATH}"# Set Laravel-specific environment variablesexport DB_CONNECTION="pgsql"export DB_DATABASE="$DB_PATH"# Set Cache environment variablesexport CACHE_STORE="redis"export CACHE_HOST="$REDIS_HOST"export CACHE_PORT="$REDIS_PORT"export CACHE_SCHEME="$REDIS_SCHEME"export CACHE_URL="${CACHE_SCHEME}://${CACHE_HOST}:${CACHE_PORT}"# Set Redis environment variablesexport REDIS_URL="$CACHE_URL"
You can customize any other environment variable this way. Remember they will always be the same value as this is committed to our repo.Let’s add the configuration to our git repo:
Let’s create an Upsun project for our application:
upsun project:create* Project title (--title)Default: Untitled Project> Watch finder* Region (--region)The region where the project will be hosted.Get a 3% discount on resources for regions with a carbon intensity of less than 100 gCO2eq/kWh. [au.platform.sh ] Sydney, Australia (AWS) [545 gC02eq/kWh] [au-2.platform.sh] Sydney, Australia (AZURE) [545 gC02eq/kWh] [ca-1.platform.sh] Montreal, Canada (AWS) [31 gC02eq/kWh] [ch-1.platform.sh] Zurich, Switzerland (GCP) [91 gC02eq/kWh] [de-2.platform.sh] Frankfurt, Germany (GCP) [416 gC02eq/kWh] [eu.platform.sh ] Dublin, Ireland (AWS) [386 gC02eq/kWh] [eu-2.platform.sh] Dublin, Ireland (AWS) [386 gC02eq/kWh] [eu-4.platform.sh] Dublin, Ireland (AWS) [386 gC02eq/kWh] [eu-5.platform.sh] Stockholm, Sweden (AWS) [23 gC02eq/kWh] [fr-3.platform.sh] Gravelines, France (OVH) [59 gC02eq/kWh] [fr-4.platform.sh] Paris, France (AZURE) [59 gC02eq/kWh] [uk-1.platform.sh] London, United Kingdom (GCP) [200 gC02eq/kWh] [us.platform.sh ] Washington, United States (AWS) [396 gC02eq/kWh] [us-2.platform.sh] Washington, United States (AWS) [396 gC02eq/kWh] [us-3.platform.sh] Moses Lake, United States (AZURE) [56 gC02eq/kWh] [us-4.platform.sh] Charleston, United States (GCP) [647 gC02eq/kWh]> us-3.platform.shDefault branch (--default-branch)The default Git branch name for the project (the production environment)Default: main>Are you sure you want to continue? [Y/n]
The Upsun bot will then provide an empty project for you and set the remote in your local git repository. Once done, you are ready to deploy:
upsun push
The pipeline will build and deploy both apps. After a couple of minutes, the boilerplate apps will be available on:
https://frontend.<branch>.<project>.<region>.platformsh.sitehttps://app.<branch>.<project>.<region>.platformsh.siteYou should be directed to the default pages for both the React and Laravel applications.We can now connect to our remote database and cache services:
upsun tunnel:openEnter a number to choose an app: [0] app [1] frontend > 0Are you sure you want to open SSH tunnel(s) to the environment main (type: production)? [Y/n]SSH tunnel opened to database at: pgsql://main:main@127.0.0.1:30000/mainSSH tunnel opened to redis at: redis://127.0.0.1:30001
You can now edit your local watches/.env to use these services:
You will need your local PHP runtime to have the phpredis extension loaded. Please refer to the following documentation on the Laravel site.If you want to use test hostnames for your applications, edit /etc/hosts or your Windows host file with the following or any other names you like:
127.0.0.1 watches.test frontend.watches.test api.watches.testIf so, update the .env file with the proper hostname:
APP_URL=http://api.watches.test
We can now launch our development services. In two terminals, run:
php artisan serve
npm run dev -- --host=frontend.watches.test
Note the -- for the argument to be able to run. Your local applications are now available at http://frontend.watches.test:5137 and http://api.watches.test.
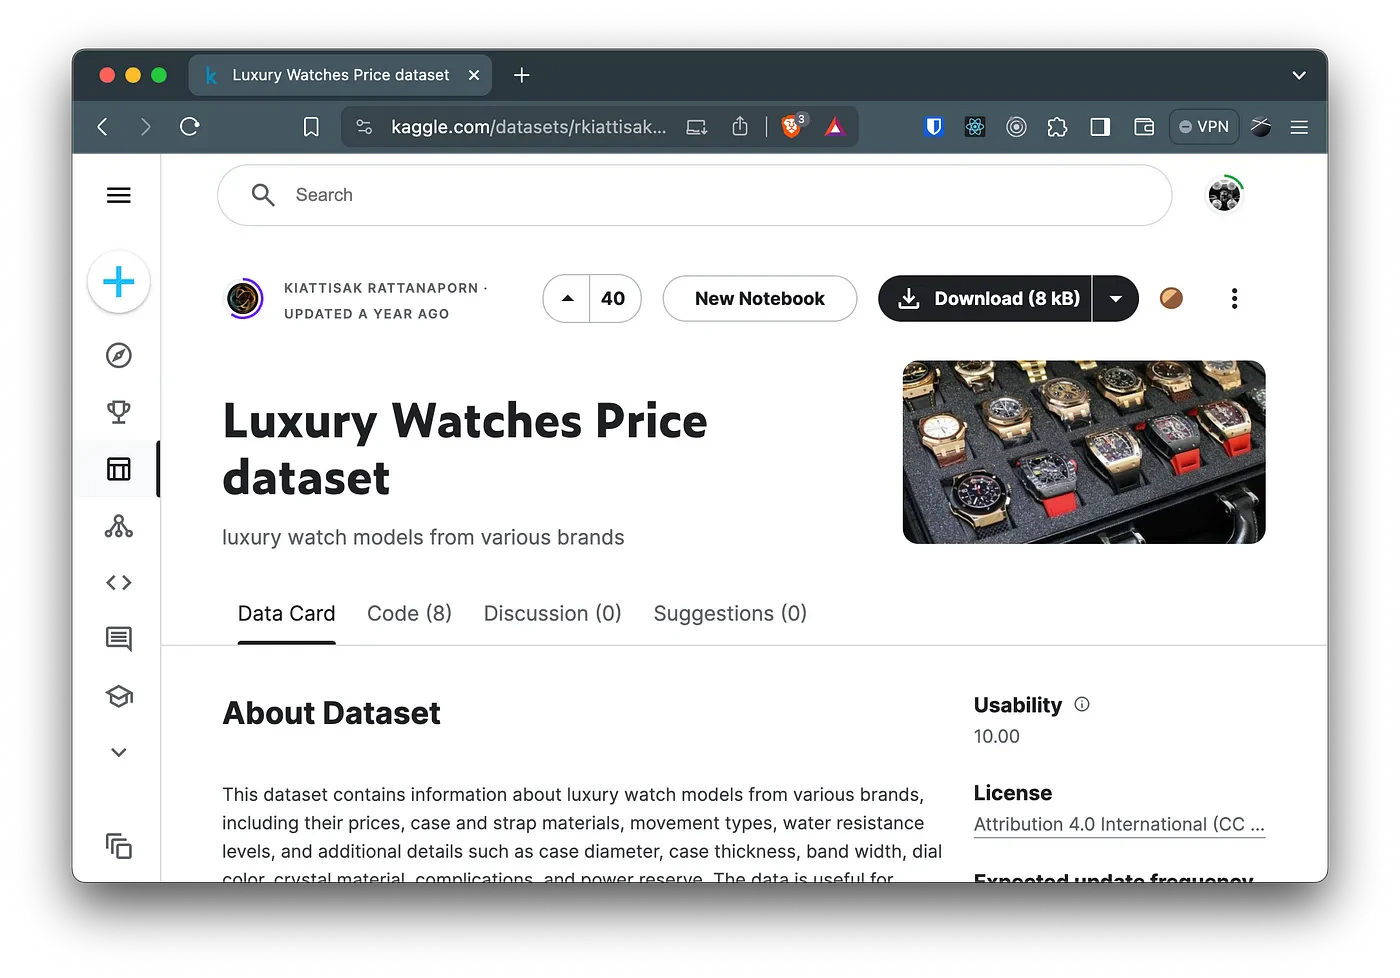
As we will recommend a specific watch to our user, we must first have a database containing the potential results. Fortunately, Kaggle has a Luxury Watch Dataset (no longer available. Check https://www.kaggle.com/kashnitsky/datasets/ for other public data sets) available for download. Create an account if needed and download the CSV file.We will now move and rename the CSV file into our project:
For us to use OpenAI and Groq APIs, we need to inject our credentials. Create new API keys from their respective websites.In Laravel, we will add the respective arrays in the services configuration:
<?phpnamespace App\Console\Commands;use Illuminate\Console\Command;class Vectorize extends Command{ /** * The name and signature of the console command. * * @var string */ protected $signature = 'app:vectorize'; /** * The console command description. * * @var string */ protected $description = 'Vectorize the CSV file and stores it into the database.'; /** * Execute the console command. */ public function handle() { \App\Jobs\Vectorize::dispatchSync(); }}
Our Vectorize job is more complex. It will:
Parse the CSV and create the watches in the database
Combine all attributes of each watch into a text string that we will send to OpenAI to get an embedding
Store that embedding in our database as a vector
<?phpnamespace App\Jobs;use App\Models\Watch;use DB;use Illuminate\Bus\Queueable;use Illuminate\Contracts\Queue\ShouldQueue;use Illuminate\Foundation\Bus\Dispatchable;use Illuminate\Queue\InteractsWithQueue;use Illuminate\Queue\SerializesModels;use OpenAI;use Pgvector\Laravel\Vector;class Vectorize implements ShouldQueue{ use Dispatchable, InteractsWithQueue, Queueable, SerializesModels; /** * Create a new job instance. */ public function __construct() { // } /** * Execute the job. */ public function handle(): void { // Empty DB DB::table('watches')->truncate(); $client = OpenAI::client(config('services.openai.key')); // Parse the CSV and get the headers $file = base_path("seeds/watches-full.csv"); $csv = array_map("str_getcsv", file($file)); $header = array_shift($csv); // Transform the rows into an array with the header and the row $watches = array_map(fn($row) => array_combine($header, $row), $csv); // Loop the CSV and create the watches in database foreach($csv as $row) { try{ Watch::create([ 'brand' => $row[0], 'model' => $row[1], 'case_material' => $row[2], 'strap_material' => $row[3], 'movement_type' => $row[4], 'water_resistance' => $row[5], 'case_diameter_mm' => $row[6], 'case_thickness_mm' => $row[7], 'band_width_mm' => $row[8], 'dial_color' => $row[9], 'crystal_material' => $row[10], 'complications' => $row[11], 'power_reserve' => $row[12], 'price_usd' => preg_replace("/[^0-9.]/", "", $row[13]), ]); } catch(\Exception $e){ ray($row); } } // Create a text version of the watch row that will list the // attributes and their values as a large string $watchesInput = collect($watches)->map(function ($watch) { $str = ''; foreach($watch as $key=>$item) { $str .= $key.':'.$item.','; } return rtrim($str, '|'); }); // Send the text version of all watches to the OpenAI embedding // endpoint. We do a batch query to avoid sending 500 different API calls $response = $client->embeddings()->create([ 'model' => 'text-embedding-3-small', 'input' => $watchesInput->toArray() ]); // Loop through the embeddings sent and update our watches // in the database with the matching embedding foreach ($response->embeddings as $embedding) { $watch = Watch::find($embedding->index + 1); $watch->embedding = new Vector($embedding->embedding); $watch->save(); } }}
You can now run the job by triggering:
php artisan app:vectorize
It should take a few seconds. Once done you can connect to your Postgres instance and check the results:
upsun sqlEnter a number to choose an app: [0] app [1] frontend > 0
psql (16.2 (Debian 16.2-1.pgdg120+2), server 15.6 (Debian 15.6-1.pgdg110+2))Type "help" for help.main=> SELECT brand, model FROM watches; brand | model---------------------+-------------------------- Omega | Seamaster Tag Heuer | Carrera Breitling | Navitimer[...]
Perfect, we have our database of 508 watches and the embeddings created from their content.
Create the API controller to get the search request
Let’s create the API controller for our frontend to query the database. The controller will take care of:
Parsing and validating the query value sent through the POST request
Creating an embedding of the query
Query the database using nearestNeighbors to find the most relevant watch
Send a streamed request to the Grok Chat API to create a proper answer with the details of the watch and the reason why it is the best.
As the response is streamed from Grok, we automatically stream it to our client using an Event Stream. This will allow us to display the answer being generated in real-time instead of waiting for the full answer being processes.
<?phpnamespace App\Http\Controllers;use App\Helpers\MarkdownHelper;use App\Http\Requests\SearchWatchRequest;use App\Models\Watch;use OpenAI;use Pgvector\Laravel\Distance;use Pgvector\Laravel\Vector;class WatchController extends Controller{ public function search(SearchWatchRequest $request) { $embeddingClient = OpenAI::client(config('services.openai.key')); $chatClient = OpenAI::factory() ->withApiKey(config('services.groq.key')) ->withBaseUri('api.groq.com/openai/v1') // default: api.openai.com/v1 ->make(); // Create the embedding of the query $response = $embeddingClient->embeddings()->create([ 'model' => 'text-embedding-3-small', 'input' => $request->input('query') ]); $embedding = new Vector($response->embeddings[0]->embedding); // Find the closest watch $neighbor = Watch::query()->nearestNeighbors('embedding', $embedding, Distance::L2)->first(); // Ask OpenAI for the closest watches $stream = $chatClient->chat()->createStreamed([ 'model' => 'llama3-8b-8192', 'messages' => [ [ 'role' => 'system', 'content' => "You are an helpful AI that will recommend watches to the user. The watch selected is below with its attributes as a list. Your response is a markdown document.First, output the brand and model of the watch as a title. Second, send the user a bullet list view of the watch attributes without doing any modification. Then, add a paragraph of why this watch matches their request using the watch attributes." ], [ 'role' => 'user', 'content' => "The recommended watch is: " . MarkdownHelper::toMarkdown($neighbor) ], ['role' => 'user', 'content' => $request->input('query')], ], ]); return response()->stream(function () use ($stream) { $i = 0; $text = ""; foreach($stream as $response){ $text .= $response->choices[0]->delta->content; $i++; echo "event: chunk\n"; echo "data: {\"index\": " . $i . ", \"chunk\": " . json_encode($response->choices[0]->delta->content) . "}\n\n"; ob_flush(); flush(); // Break the loop if the client aborted the connection (closed the page) if (connection_aborted()) { break; } } }, 200, [ 'Cache-Control' => 'no-cache', 'X-Accel-Buffering' => 'no', 'Content-Type' => 'text/event-stream', ]); }}
As you can see, we are validating the POST request via the SearchWatchRequest validator. Remember to return true in the authorize() method, or you will get a 403 when POSTing to it.
<?phpnamespace App\Http\Requests;use Illuminate\Foundation\Http\FormRequest;class SearchWatchRequest extends FormRequest{ /** * Determine if the user is authorized to make this request. */ public function authorize(): bool { return true; } /** * Get the validation rules that apply to the request. * * @return array<string, \Illuminate\Contracts\Validation\ValidationRule|array<mixed>|string> */ public function rules(): array { return [ 'query' => 'required|string', ]; }}
In a production application, you must also validate that the user exists and is not abusing the system. You can leverage Laravel Sanctum for this.
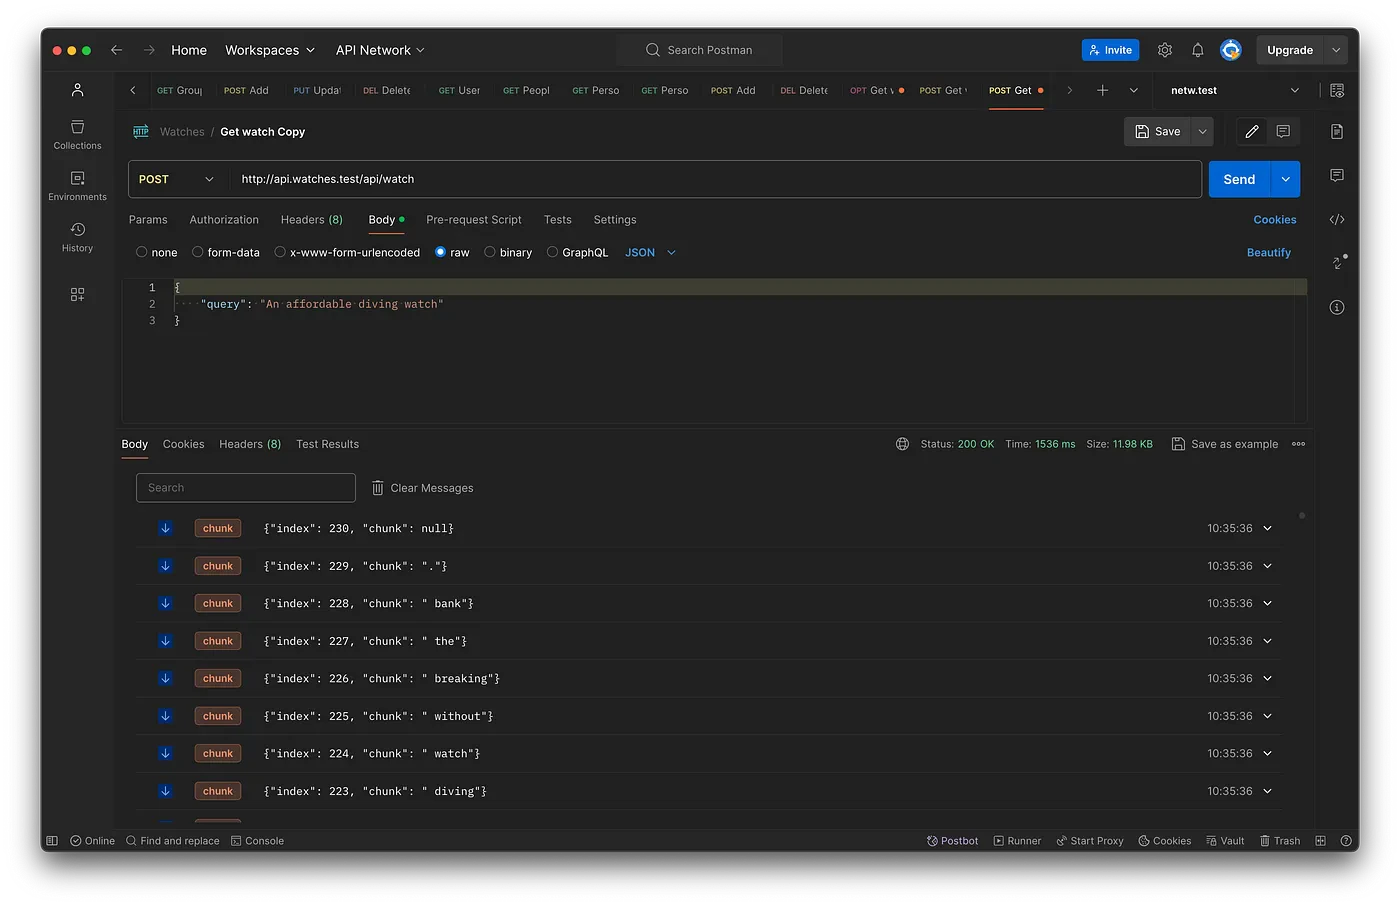
You can now use curl or a tool like Postman to query the API and get your result. As you can see, the result is streamed in chunks by our Laravel API. Congratulations!
Add the vectorize job in .upsun/config.yaml so it is done every time in the background after you deploy the app without impacting the app availability. You might want to trigger this manually if you have more data to avoid increasing your OpenAI bill too much.
getApiURL will use our local development values if the hostname is watches.test. If not, it will replace the frontend string with api on any other hostname. This will allow us to make it functional in any preview environment on Upsun as well as production. You can always change the logic there to map your own deployment needs.
The JSX is rendered on load. We use a <Markdown/> field to render the answer.
The user writes a prompt in the main <TextArea/> that is store in a variable prompt using useState.
When clicking the <Button/> , the script triggers submitForm() which creates a newStreamResponse
newStreamResponse starts by setting the state variable streaming as true so we can use it to freeze our UI while the request loads and reset the answer as well as creating a local variable named messageContent to store the stream content coming back from the API.
It then uses fetchEventSource to query our Laravel API. The openWhenHidden option specifies if the stream should be listened to when the tab or window is not in focus. We pass our prompt as the body of this POST request.
The onmessage method defines how we treat incoming data from the Event stream. Here we concatenate the new chunk to our messageContent and then update the state variable answer to show the result. In case your content is too long or the chunks are coming in too fast, you might want to delay the update to avoid too many renderings.
When the stream ends, we reset the streaming variable to false.
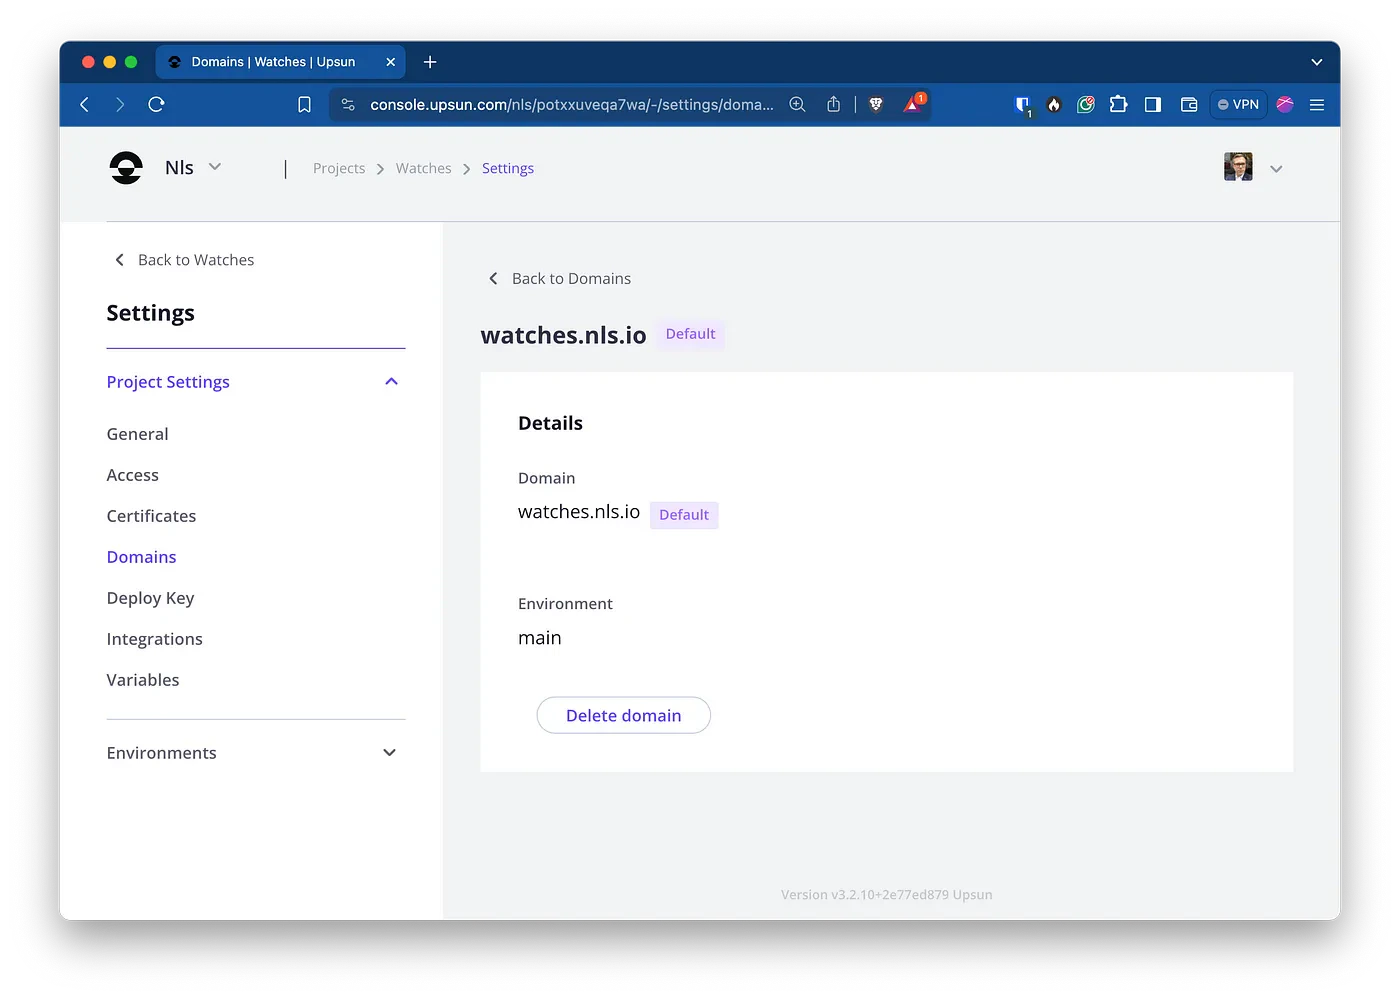
You can now use the frontend URL that Upsun gave you in the deploy log to access your app. Let’s query it!Everything works as expected! You can see in my recording above, that I am using a custom hostname. In your Upsun console, click the Go Live button and follow the instructions to configure your DNS and setup the domain!
While this example is stripped down to the core, it is interesting to see how you can leverage embeddings for search, classification or any other Machine Learning process. With all the tooling now available, it becomes super accessible to everyone to query models and run these applications on a Cloud Applications Platform like Upsun.com.
Last modified on October 23, 2026
Was this page helpful?
Assistant
Responses are generated using AI and may contain mistakes.


 Dispatch
 Cloud
Cloud