The assumptions
For the purpose of this article and the steps detailed, I will assume that you have:- A GitLab account and a repository with working code
- Administrative rights on the GitLab repository (so you can add CI/CD variables)
- A Platform.sh account and a project for your code base with working code
- A default branch in GitLab which is the same branch as your production branch in Platform.sh
- A default branch in Platform.sh which is also your production branch
- You do not have a source code integration created between Platform.sh and GitLab.
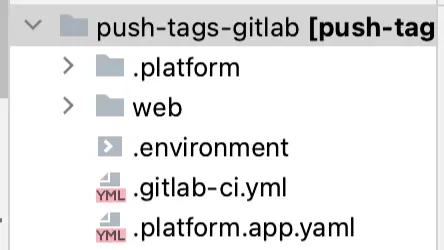
The .gitlab-ci.yaml file
While GitHub has a .github/workflows directory where any *.yaml file can be a workflow definition, GitLab
consolidates the CI/CD configuration into a single file named
.gitlab-ci.yml. This file must be in the root of your repository and contain everything needed to run your GitLab
pipeline.
The event
Unlike GitHub workflows, GitLab pipelines are triggered1 when any commit is pushed to your repository. In our case, we only want the pipeline to run when a tag is pushed or created. Instead of defining the specific event we want to trigger our pipeline, we’ll build a set of rules to define which type of push should trigger our pipeline. To build these rules we’ll utilize theworkflow property which controls
when pipelines are run.
$CI_COMMIT_TAG contains the commit tag name and, most importantly, is only set in tag
pipelines. The $CI_PIPELINE_SOURCE variable contains how the pipeline was triggered. Since we want a tag push, we want
to only run this pipeline if the trigger is a push event. I’ve also added a name property so this pipeline is easier
to identify in the repository’s pipelines area.
The stages
Like with GitHub, we’ll need to define a series of jobs that perform the tasks. And also just like with GitHub, jobs run in parallel by default. However, unlike GitHub Actions, GitLab gives us a way to control the order in which jobs run with stages. The stages are executed in order2, and later stages can only start at earlier stages that have been completed. Before we define our jobs, we’ll define the stages that should occur, and then we’ll attach jobs3 to their relevant stage.setup stage, where I’ll add the jobs that check to see if the tag that was pushed is one we want to
deploy to Platform.sh, and a perform stage where I’ll add the jobs to perform the push.
Caching
You might be wondering, “Why is there a section on caching when we just want to see if we need to push, and why is it before we’ve defined any jobs?” Unlike GitHub and its outputs, GitLab does not provide a straightforward way to share small bits of data between jobs and stages. To facilitate data sharing they instead utilize artifacts and cache. In either case, we have to use a file to store the data we want to share. Since job artifacts were specifically designed for sharing intermediate build results between stages, in the case of just needing to pass a small bit of data to the next stage, it’s overkill. Instead, for this pipeline, we’ll set up caching and cache a single file to share data between our stages. Caching needs to be set up on a per-job basis but since we want both stages and their jobs to access the same cache, we’ll define our cache instead in the default area of our pipeline.&global_cache) to set up a
reusable cache definition at the global level that I then reference in each job, but with the ability to override any
properties as needed. A cache is required to have a unique
key, and jobs that use the same cache key will use the same cache. Perfect for what we need!
We then define the file we want to cache (push.txt) using the paths
property and instruct GitLab to always save the cache with
when.
The jobs
Now I’ll define my jobs and attach them to the stage where they should run. To make things easy to read, I’ll define the job in thesetup stage first and attach it to setup using the stage property:
before_script property. Any steps defined in before_script are executed before the job is
started which allows us to alter the default behavior:
should_we_push job begins, we’ll fetch any changes from GitLab, then fetch all the tags, and finally
checkout the default branch. This is fairly similar to what we accomplished in the GitHub Actions article when we used
the actions/checkout action to checkout our repository using the default branch with a depth of 0. The script section
seen below contains the commands we want our runner to execute.
Note: to keep the sample code short, I’m
<snip>ing the code we’ve already covered. The complete workflow file is
available at the end of this article.git describe),
exactly the same as we did in the GitHub workflow. If so, we set the value of pushToPSH to yes and save that value
in the push.txt that we’ll save in our cache.
Last we need to set up the cache configuration for the job:
*global_cache) which tells the YAML parser to grab
that named section and reuse it. The <<: informs the YAML parser that I’m going to add value or override existing ones
to the section.
Since we never want this job to reuse the cache from a previous run, I’ll override the
default policy of pull-push to only push for this job
(i.e. only upload a cache when the job is complete, never download cache when the job starts).
I’ll next define our second job and attach it to the perform stage:
should_we_push job, I’m reusing the cache configuration I created in the default section
(*global_cache), but this time I’m changing the policy to pull. This ensures the cache will always be downloaded
before the job begins, but never uploads the cache when the job completes.
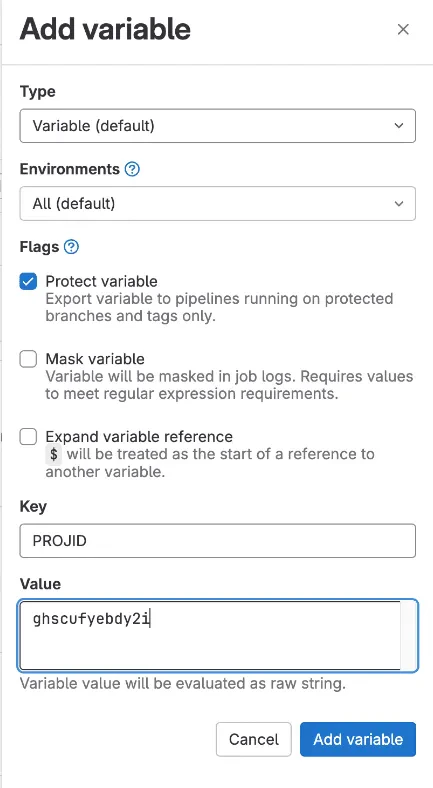
Before we can build out the rest of the steps, just like we did with GitHub, we’ll need to create a couple of repository
variables that we can access in our steps. Make sure you’ve
generated a Platform.sh API token,
and have the Platform.sh ID of your project.
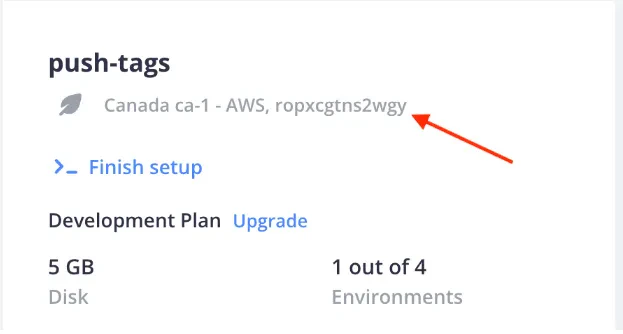
To locate your project’s ID, if you are logged into the
console,
you can locate your project’s ID under the title of your project, to the right of the project’s region when viewing the
project’s page:
PLATFORM_CLI_TOKEN5 and one for PROJID, setting the values as appropriate.
should_we_push job determined
this was a tag we want to deploy to Platform.sh, that is.
yes” is contained in our cached push.txt file, the rest of the steps are identical to
the steps we used in the GitHub Actions article for the we_should_push job.
Your .gitlab-ci.yml file is now ready to commit to your repository and push it to GitLab. You’ll need to follow
whatever workflow path you use to get the file into your production branch, be it pushing directly, if allowed, or
through a pull request process.
You’re all set
Now that the.gitlab-ci.yml file is committed into your default branch, any future tags that are pushed to GitLab, or
created on GitLab when creating a release will trigger the pipeline. If the tag is newer than any other tags (closest
to the current commit), our we_shou job will run and push that tag to Platform.sh and deploy your new code base!
Take a look at the complete GitLab pipeline file.
Footnotes
- They can also be triggered by other pipelines, an API call, on a schedule, etc. ↩
- Jobs within stages are still executed in parallel. ↩
- Jobs that are in the same stage then run in parallel. ↩
- The order of where you define the cache strategy is irrelevant as long as it is a property of the job. ↩
-
You can use a different name for the CI/CD variable but if so, then you will need to add a
variables property to the job, mapping
PLATFORMSH_CLI_TOKENto the name you used. ↩