> ## Documentation Index
> Fetch the complete documentation index at: https://developer.upsun.com/llms.txt
> Use this file to discover all available pages before exploring further.
# Blackfire for PHP and Python
> A full access to Blackfire is bundled with your PHP and Python Upsun projects.
Full access to [Blackfire](https://www.blackfire.io/) is bundled with all your PHP and
Python Upsun projects.
Blackfire is the **official Upsun observability service** that helps you
improve the performance of your apps at each stage of their lifecycle.
With Blackfire's unique Application Performance Monitoring (APM), Profiling,
Alerting, and Testing features, you can achieve the following goals:
* Avoid performance bottlenecks by proactively identifying issues in your code
* Promptly solve identified issues by taking advantage of actionable recommendations
* Create performance budgets for critical parts of your app and get alerted of any
problem before a change hits your production
Blackfire is installed natively on Upsun and [works integrally with the Upsun workflow](https://www.youtube.com/watch?v=Bq-LFjgD6L0).
This results in an effortless setup process and smooth user experience.
## Get started with Blackfire
You can only access your Blackfire environments after you've been granted access to the related Upsun project.
Therefore, to access your Blackfire environments, make sure you log in using your Upsun account.
To access a Blackfire environment, each project user needs a Blackfire account.
When a project user doesn't already have a Blackfire account,
a new one is automatically created using the user's Upsun credentials.
If you're using a [Content Delivery Network (CDN)](/docs/domains/cdn),
make sure you [configure it](https://blackfire.io/docs/integrations/proxies/index)
to let Blackfire profile the code running on your servers.
### Automated integration
The Blackfire automated integration is enabled on your environments by default.
When you create a new environment,
it automatically triggers the creation of a Blackfire environment with the same settings.
On this Blackfire environment, you have access to [all the features provided by Blackfire](https://www.blackfire.io/features/).
This includes monitoring, profiling, alerting, and build-related features.
Note that Blackfire monitoring is enabled by default on your production environment.
On other environment types, you need to [enable it](#blackfire-monitoring).
User access settings are replicated from the Upsun Console to Blackfire -- this includes all [access levels](https://blackfire.io/docs/up-and-running/access-management).
You might have Blackfire variables already set on your project.
In this case, the existing variables override the settings of the automated integration.
To trigger the synchronization of changes to users and their access levels,
you need to redeploy the environment.
### Blackfire monitoring
Blackfire monitoring is enabled by default on your production environment.
To enable Blackfire monitoring on your development or staging environments, follow these steps:
1. Go to your [organizations list](https://blackfire.io/my/organizations)
and select the organization where you want to enable Blackfire monitoring.
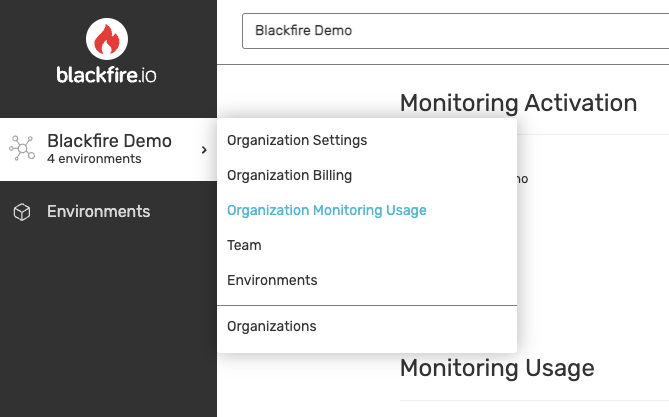
2. Click **Organization Monitoring Usage**.
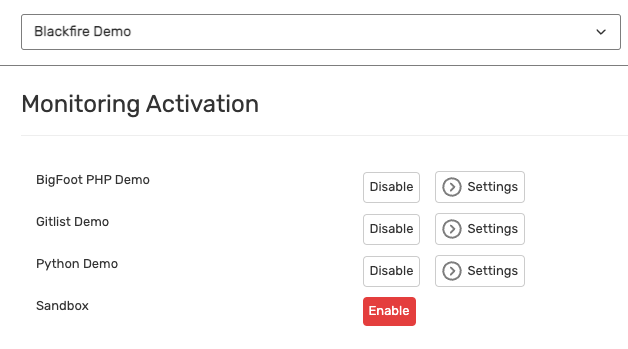
3. In the **Monitoring Activation** section,
enable monitoring on the environments of your choice.
For more information on Blackfire monitoring features,
see the [Blackfire documentation](https://blackfire.io/docs/monitoring-cookbooks/index).
## Blackfire Profiling
While your code is running, the Blackfire profiler collects deep performance metrics
and provides full details and context of your code's behavior.
This helps you find the root cause of performance bottlenecks.
Blackfire lets you profile your application anywhere it's deployed,
including on your local development machines.
Using a browser extension or CLI command,
you can profile HTTP requests, CLI scripts, Consumers, and Daemons.
While HTTP requests can be profiled out-of-the-box, CLI profiling requires a
[specific configuration](https://blackfire.io/docs/integrations/paas/upsun#cli-profiling).
For more information on Blackfire profiling features,
see the [Blackfire documentation](https://blackfire.io/docs/profiling-cookbooks/index).
Blackfire profiles are also one of the observability signals correlated by the [Upsun performance agent](/docs/get-started/ai/upsun-performance-agent), which analyzes up to 7 days of profiling and traffic data alongside your application source code to generate a performance analysis report with recommendations.
## Test the performance of each new deployment
Blackfire's native integration with Upsun enables you to test your app's performance
every time you deploy a branch in production, staging, or development.
Follow these steps:
1. Set up the [Blackfire Builds integration](https://blackfire.io/docs/integrations/paas/upsun#builds).
2. Optional: set up an [integration with your Git provider](https://blackfire.io/docs/integrations/git/index)
and get commit status updates from build reports.
3. Recommended: test business-critical use cases, with Blackfire [synthetic monitoring](https://blackfire.io/docs/builds-cookbooks/scenarios).
## Troubleshooting
### Bypass your reverse proxy, load balancer or CDN
To use [Blackfire profiling](#blackfire-profiling), you need to bypass any reverse
proxy, load balancer or [CDN](/docs/domains/cdn) that sits in front of your app.
See [how to configure a bypass](https://blackfire.io/docs/reference-guide/reverse-proxies#documentation).
### Configure your HTTP cache
To take advantage of Blackfire features while using the HTTP cache with cookies,
allow the `__blackfire` cookie to go through the cache.
To do so, add [a configuration](/docs/routes/cache#allowing-only-specific-cookies)
similar to the following:
```yaml .upsun/config.yaml theme={null}
routes:
"https://{default}/":
cache:
enabled: true
cookies: ["/SESS.*/", "__blackfire"]
```
## Get support
If you're experiencing issues with Blackfire and [troubleshooting](#troubleshooting)
information doesn't help, follow these steps:
1. Retrieve [startup errors](#1-retrieve-startup-errors).
2. Retrieve your [Blackfire logs](#2-retrieve-your-blackfire-logs).
3. Send this data to [Blackfire Support](https://support.blackfire.io).
### 1. Retrieve startup errors
To retrieve startup errors, run the following command:
```bash theme={null}
upsun ssh -- php -d display_startup_errors=on --ri blackfire
```
### 2. Retrieve your Blackfire logs
To retrieve your Blackfire logs, follow these steps:
1. On the environment where you're facing issues, create the following [variable](/docs/development/variables/set-variables):
```bash theme={null}
upsun variable:create php:blackfire.log_file --value /tmp/blackfire.log
```
2. To set the verbosity of the logs to level 4 (debug level), create the following variable:
```bash theme={null}
upsun variable:create php:blackfire.log_level --value 4
```
3. Start a profile or build.
4. To display the logs, run the following command:
```bash theme={null}
upsun ssh -- cat /tmp/blackfire.log > blackfire.log
```
After you've retrieved the logs, you can disable them.
To do so, run the following commands:
```bash theme={null}
upsun variable:delete php:blackfire.log_file
upsun variable:delete php:blackfire.log_level
```
 3. In the **Monitoring Activation** section,
enable monitoring on the environments of your choice.
3. In the **Monitoring Activation** section,
enable monitoring on the environments of your choice.
 For more information on Blackfire monitoring features,
see the [Blackfire documentation](https://blackfire.io/docs/monitoring-cookbooks/index).
## Blackfire Profiling
While your code is running, the Blackfire profiler collects deep performance metrics
and provides full details and context of your code's behavior.
This helps you find the root cause of performance bottlenecks.
Blackfire lets you profile your application anywhere it's deployed,
including on your local development machines.
Using a browser extension or CLI command,
you can profile HTTP requests, CLI scripts, Consumers, and Daemons.
While HTTP requests can be profiled out-of-the-box, CLI profiling requires a
[specific configuration](https://blackfire.io/docs/integrations/paas/upsun#cli-profiling).
For more information on Blackfire profiling features,
see the [Blackfire documentation](https://blackfire.io/docs/profiling-cookbooks/index).
Blackfire profiles are also one of the observability signals correlated by the [Upsun performance agent](/docs/get-started/ai/upsun-performance-agent), which analyzes up to 7 days of profiling and traffic data alongside your application source code to generate a performance analysis report with recommendations.
## Test the performance of each new deployment
Blackfire's native integration with Upsun enables you to test your app's performance
every time you deploy a branch in production, staging, or development.
Follow these steps:
1. Set up the [Blackfire Builds integration](https://blackfire.io/docs/integrations/paas/upsun#builds).
2. Optional: set up an [integration with your Git provider](https://blackfire.io/docs/integrations/git/index)
and get commit status updates from build reports.
3. Recommended: test business-critical use cases, with Blackfire [synthetic monitoring](https://blackfire.io/docs/builds-cookbooks/scenarios).
## Troubleshooting
### Bypass your reverse proxy, load balancer or CDN
To use [Blackfire profiling](#blackfire-profiling), you need to bypass any reverse
proxy, load balancer or [CDN](/docs/domains/cdn) that sits in front of your app.
See [how to configure a bypass](https://blackfire.io/docs/reference-guide/reverse-proxies#documentation).
### Configure your HTTP cache
To take advantage of Blackfire features while using the HTTP cache with cookies,
allow the `__blackfire` cookie to go through the cache.
To do so, add [a configuration](/docs/routes/cache#allowing-only-specific-cookies)
similar to the following:
```yaml .upsun/config.yaml theme={null}
routes:
"https://{default}/":
cache:
enabled: true
cookies: ["/SESS.*/", "__blackfire"]
```
## Get support
If you're experiencing issues with Blackfire and [troubleshooting](#troubleshooting)
information doesn't help, follow these steps:
1. Retrieve [startup errors](#1-retrieve-startup-errors).
2. Retrieve your [Blackfire logs](#2-retrieve-your-blackfire-logs).
3. Send this data to [Blackfire Support](https://support.blackfire.io).
### 1. Retrieve startup errors
To retrieve startup errors, run the following command:
```bash theme={null}
upsun ssh -- php -d display_startup_errors=on --ri blackfire
```
### 2. Retrieve your Blackfire logs
To retrieve your Blackfire logs, follow these steps:
1. On the environment where you're facing issues, create the following [variable](/docs/development/variables/set-variables):
```bash theme={null}
upsun variable:create php:blackfire.log_file --value /tmp/blackfire.log
```
2. To set the verbosity of the logs to level 4 (debug level), create the following variable:
```bash theme={null}
upsun variable:create php:blackfire.log_level --value 4
```
3. Start a profile or build.
4. To display the logs, run the following command:
```bash theme={null}
upsun ssh -- cat /tmp/blackfire.log > blackfire.log
```
After you've retrieved the logs, you can disable them.
To do so, run the following commands:
```bash theme={null}
upsun variable:delete php:blackfire.log_file
upsun variable:delete php:blackfire.log_level
```
For more information on Blackfire monitoring features,
see the [Blackfire documentation](https://blackfire.io/docs/monitoring-cookbooks/index).
## Blackfire Profiling
While your code is running, the Blackfire profiler collects deep performance metrics
and provides full details and context of your code's behavior.
This helps you find the root cause of performance bottlenecks.
Blackfire lets you profile your application anywhere it's deployed,
including on your local development machines.
Using a browser extension or CLI command,
you can profile HTTP requests, CLI scripts, Consumers, and Daemons.
While HTTP requests can be profiled out-of-the-box, CLI profiling requires a
[specific configuration](https://blackfire.io/docs/integrations/paas/upsun#cli-profiling).
For more information on Blackfire profiling features,
see the [Blackfire documentation](https://blackfire.io/docs/profiling-cookbooks/index).
Blackfire profiles are also one of the observability signals correlated by the [Upsun performance agent](/docs/get-started/ai/upsun-performance-agent), which analyzes up to 7 days of profiling and traffic data alongside your application source code to generate a performance analysis report with recommendations.
## Test the performance of each new deployment
Blackfire's native integration with Upsun enables you to test your app's performance
every time you deploy a branch in production, staging, or development.
Follow these steps:
1. Set up the [Blackfire Builds integration](https://blackfire.io/docs/integrations/paas/upsun#builds).
2. Optional: set up an [integration with your Git provider](https://blackfire.io/docs/integrations/git/index)
and get commit status updates from build reports.
3. Recommended: test business-critical use cases, with Blackfire [synthetic monitoring](https://blackfire.io/docs/builds-cookbooks/scenarios).
## Troubleshooting
### Bypass your reverse proxy, load balancer or CDN
To use [Blackfire profiling](#blackfire-profiling), you need to bypass any reverse
proxy, load balancer or [CDN](/docs/domains/cdn) that sits in front of your app.
See [how to configure a bypass](https://blackfire.io/docs/reference-guide/reverse-proxies#documentation).
### Configure your HTTP cache
To take advantage of Blackfire features while using the HTTP cache with cookies,
allow the `__blackfire` cookie to go through the cache.
To do so, add [a configuration](/docs/routes/cache#allowing-only-specific-cookies)
similar to the following:
```yaml .upsun/config.yaml theme={null}
routes:
"https://{default}/":
cache:
enabled: true
cookies: ["/SESS.*/", "__blackfire"]
```
## Get support
If you're experiencing issues with Blackfire and [troubleshooting](#troubleshooting)
information doesn't help, follow these steps:
1. Retrieve [startup errors](#1-retrieve-startup-errors).
2. Retrieve your [Blackfire logs](#2-retrieve-your-blackfire-logs).
3. Send this data to [Blackfire Support](https://support.blackfire.io).
### 1. Retrieve startup errors
To retrieve startup errors, run the following command:
```bash theme={null}
upsun ssh -- php -d display_startup_errors=on --ri blackfire
```
### 2. Retrieve your Blackfire logs
To retrieve your Blackfire logs, follow these steps:
1. On the environment where you're facing issues, create the following [variable](/docs/development/variables/set-variables):
```bash theme={null}
upsun variable:create php:blackfire.log_file --value /tmp/blackfire.log
```
2. To set the verbosity of the logs to level 4 (debug level), create the following variable:
```bash theme={null}
upsun variable:create php:blackfire.log_level --value 4
```
3. Start a profile or build.
4. To display the logs, run the following command:
```bash theme={null}
upsun ssh -- cat /tmp/blackfire.log > blackfire.log
```
After you've retrieved the logs, you can disable them.
To do so, run the following commands:
```bash theme={null}
upsun variable:delete php:blackfire.log_file
upsun variable:delete php:blackfire.log_level
```