> ## Documentation Index
> Fetch the complete documentation index at: https://developer.upsun.com/llms.txt
> Use this file to discover all available pages before exploring further.
# Build and deploy
> See how applications get built and deployed with Upsun.
Each time you push a change to your app through Git or activate an [environment](/docs/environments),
your app goes through a process to be built and deployed.
If your app is redeployed with no changes to its codebase, the output of the previous build and deploy process is reused.
The build process looks through the configuration files in your repository and assembles the necessary containers.
The deploy process makes those containers live, replacing any previous versions, with minimal interruption in service.
```mermaid theme={null}
---
config:
theme: base
themeVariables:
primaryColor: '#F7F8F8'
primaryTextColor: '#0E1113'
primaryBorderColor: '#6046FF'
lineColor: '#6046FF'
secondaryColor: '#F7F8F8'
tertiaryColor: '#F7F8F8'
background: 'transparent'
mainBkg: '#F7F8F8'
nodeBorder: '#6046FF'
nodeTextColor: '#0E1113'
clusterBkg: '#FFFFFF'
clusterBorder: '#6046FF'
titleColor: '#0E1113'
edgeLabelBackground: 'transparent'
transitionColor: '#6046FF'
look: neo
fontSize: 18
---
stateDiagram
direction LR
state Build {
direction TB
GitPush --> ValidateConfig
ValidateConfig --> PullImage
PullImage --> InstallDeps
InstallDeps --> BuildFlavor
BuildFlavor --> BuildHook
BuildHook --> FreezeContainer
GitPush
ValidateConfig
PullImage
InstallDeps
BuildFlavor
BuildHook
FreezeContainer
}
state Deploy {
direction TB
HoldRequests --> UnmountContainers
UnmountContainers --> MountFS
MountFS --> ExposeServices
ExposeServices --> StartCommand
StartCommand --> DeployHook
DeployHook --> ServeRequests
HoldRequests
UnmountContainers
MountFS
ExposeServices
StartCommand
DeployHook
ServeRequests
}
Build --> Deploy
Build:BUILD PHASE
GitPush:Git push or activation
ValidateConfig:Validate configuration
PullImage:Pull container image
InstallDeps:Install dependencies
BuildFlavor:Run build flavor commands
BuildHook:Run build hook
FreezeContainer:Freeze app container
Deploy:DEPLOY PHASE
HoldRequests:Hold requests
UnmountContainers:Unmount current containers
MountFS:Mount file systems
ExposeServices:Expose services
StartCommand:Run start command
DeployHook:Run deploy hook
ServeRequests:Serve requests
style Build fill:#FFFFFF,stroke:#6046FF
style Deploy fill:#FFFFFF,stroke:#6046FF
```
```mermaid theme={null}
---
config:
theme: base
themeVariables:
primaryColor: '#2B3134'
primaryTextColor: '#FFFFFF'
primaryBorderColor: '#BFB5FF'
lineColor: '#BFB5FF'
secondaryColor: '#2B3134'
tertiaryColor: '#2B3134'
background: 'transparent'
mainBkg: '#2B3134'
nodeBorder: '#BFB5FF'
nodeTextColor: '#FFFFFF'
clusterBkg: '#191C1E'
clusterBorder: '#BFB5FF'
titleColor: '#BFB5FF'
edgeLabelBackground: 'transparent'
transitionColor: '#BFB5FF'
look: neo
fontSize: 18
---
stateDiagram
direction LR
state Build {
direction TB
GitPush --> ValidateConfig
ValidateConfig --> PullImage
PullImage --> InstallDeps
InstallDeps --> BuildFlavor
BuildFlavor --> BuildHook
BuildHook --> FreezeContainer
GitPush
ValidateConfig
PullImage
InstallDeps
BuildFlavor
BuildHook
FreezeContainer
}
state Deploy {
direction TB
HoldRequests --> UnmountContainers
UnmountContainers --> MountFS
MountFS --> ExposeServices
ExposeServices --> StartCommand
StartCommand --> DeployHook
DeployHook --> ServeRequests
HoldRequests
UnmountContainers
MountFS
ExposeServices
StartCommand
DeployHook
ServeRequests
}
Build --> Deploy
Build:BUILD PHASE
GitPush:Git push or activation
ValidateConfig:Validate configuration
PullImage:Pull container image
InstallDeps:Install dependencies
BuildFlavor:Run build flavor commands
BuildHook:Run build hook
FreezeContainer:Freeze app container
Deploy:DEPLOY PHASE
HoldRequests:Hold requests
UnmountContainers:Unmount current containers
MountFS:Mount file systems
ExposeServices:Expose services
StartCommand:Run start command
DeployHook:Run deploy hook
ServeRequests:Serve requests
style Build fill:#191C1E,stroke:#BFB5FF
style Deploy fill:#191C1E,stroke:#BFB5FF
```
Hooks are points in the build and deploy process where you can inject a custom script.
## The build
The outcome of the build process is designed to be repeatable and reusable.
Each app in a project is built separately.
Container configuration depends exclusively on your configuration files.
So each container is tied to a specific Git commit.
If there are no new changes for a given container, the existing container can be reused.
This saves you the time the build step would take.
This means the build is independent of the given environment and preview environments are perfect copies of production.
If you use environment variables to set up different build configuration options for different environments,
your build step isn't reused and your preview environments may differ from production.
You can't connect to services (like databases) during the build step.
Once the app has gone through all of the build steps, it can connect to services in the deploy process.
### Build steps
The configuration is checked by validating the `.upsun/` directory and scanning the repository for any app configuration to validate.
Any container images that have been built before and that don't have any changes are pulled to be reused.
If you have specified additional global dependencies, they're downloaded during this step.
This is useful for commands you may need in the build hook.
For some languages (NodeJS, PHP), a series of standard commands are run based on the build flavor.
You can change the flavor or skip the commands by specifying it in your `.upsun/config.yaml` file.
The `build` hook comprises one or more shell commands that you write to finish creating your production code base: for example, compiling Sass files, running a bundler, rearranging files on disk, or compiling.
The committed build hook runs in the build container.
During this time, commands have write access to the file system, but there aren't connections to other containers (services and other apps).
For automated builds, you can use the [`CI` environment variable](/docs/development/variables/use-variables#use-provided-variables) in build scripts and tooling to modify build behavior (for example, to disable attempts to connect to other containers during the build phase, or to disable interactivity). These modifications can help to prevent build failures.
You can also manually [cancel deployments stuck on the build hook](/docs/environments/cancel-activity).
The file system is frozen and produces a read-only container image, which is the final build artifact.
## The deploy
The deploy process connects each container from the build process and any services.
The connections are defined in your app and services configuration.
So unlike the build process, you can now access other containers,
but the file system is read-only.
### Deploy steps
Incoming [idempotent requests](https://www.iana.org/assignments/http-methods/http-methods.xhtml) (like `GET`, `PUT`, `DELETE` but **not** `POST`, `PATCH` etc.) are held.
Any previous containers are disconnected from their file system mounts.
The file system is connected to the new containers.
New branches have file systems cloned from their parent.
Networking connections are opened between any containers specified in your app and services configurations.
The [commands](/docs/configure-apps/image-properties/web#web-commands) necessary to start your app are run.
Often this stage will only include a start command, which is restarted if ever terminated going forward.
You may also, however, define a `pre_start` command, when you need to run *per-instance* actions.
In this case, as you might expect, the `pre_start` command is run, then the `start` command.
The `deploy` hook is any number of shell commands you can run to finish your deployment.
This can include clearing caches, running database migrations, and setting configuration that requires relationship information.
Incoming requests to your newly deployed application are allowed.
After the deploy process is over, any commands in your `post_deploy` hook are run.
## Deployment types
Upsun supports two deployment types - automatic and manual. These types help to provide control over when changes are applied to development, staging and production environments.
### Automatic deployment (default)
This is the default behavior for all environments. With automatic deployment, changes like code pushes and variable updates are deployed immediately. This type of deployment is best suited for rapid iteration during development.
### Manual deployment
You can deploy applications manually in any environment type (development/preview, staging, and production). When [enabled](#change-deployment-type), manual deployment lets you control when deployments happen: changes are staged but not deployed until you explicitly trigger a deployment. Manual deployment is ideal for teams that want to bundle multiple changes and deploy them together in a controlled manner.
When manual deployment is enabled in an environment, the following actions are queued until deployment is triggered:
| Category | Staged Activities |
| ------------------------ | --------------------------------------------------------------- |
| **Code** | `environment.push`, `environment.merge`, `environment.merge-pr` |
| **Variables** | `environment.variable.create`, `update`, `delete` |
| **Resources** | `environment.resources.update` |
| **Domains & Routes** | `environment.domain.*`, `environment.route.*` |
| **Subscription** | `environment.subscription.update ` |
| **Environment Settings** | `environment.update.http_access`, `smtp`, `restrict_robots` |
To restart your application without applying staged changes, run `upsun redeploy` or click **Redeploy** in the Console.
### Change deployment type
You can adjust deployment behavior in your environment.
Use the following command in the CLI to view or change the deployment type:
```bash theme={null}
upsun environment:deploy:type
```
The output should look similar to the example below:
```bash theme={null}
Selected project: [my-project (ID)]
Selected environment: main (type: production)
Deployment type: manual
```
To switch to manual, navigate to the environment settings in the Console and select the manual deployments option.
### Trigger deployment manually
Once manual deployment is enabled, eligible changes are staged. You can deploy them in the following ways:
Deploy staged changes to your chosen environment using the following command:
```bash theme={null}
upsun environment:deploy
```
The output should look similar to the example below:
```bash theme={null}
Deploying staged changes:
+---------------+---------------------------+-----------------------------------------------------------+---------+
| ID | Created | Description | Result |
+---------------+---------------------------+-----------------------------------------------------------+---------+
| 5uh3xwmkh5boq | 2026-01-01T14:01:10+00:00 | Patrick pushed to main | failure |
| fno2qiodq7e3c | 2026-01-01T13:06:18+00:00 | Arseni updated resource allocation on main | success |
| xzvcazrtoafeu | 2026-01-01T13:01:10+00:00 | Pilar added variable HELLO_WORLD to main | success |
| fq73u53ruwloq | 2026-01-01T12:06:17+00:00 | Pilar pushed to main | success |
+---------------+---------------------------+-----------------------------------------------------------+---------+
```
In the Console, a deploy button will be visible in the environment whenever changes are staged. Click this button to deploy your staged changes.
Trigger the deployment of staged changes with the following:
```bash theme={null}
POST /projects/{projectId}/environments/{environmentId}/deploy
```
As soon as your deployment type is switched from manual to automatic, all currently staged changes are deployed immediately and the environment resumes its default automatic deployment behavior.
## Zero Downtime Deployments
## What is Zero Downtime?
By default, deployments use a stop-start [deployment strategy](#deployment-strategies) (services stop, then restart with updates). Zero Downtime Deployments use a *rolling* deployment strategy, enabling you to deploy changes to your environment without taking your app offline and without interrupting live traffic.
## How Zero Downtime works
Instead of stopping services before updating, a temporary copy of your application is created and prepared behind the scenes during the deployment process. Your services work with both the original application and the temporary copy during the whole deployment process, which means that any changes you make to your services during deployment will be applied to the original application. Here's the step-by-step process:
* Upsun starts a temporary container that runs a cloned version of your app.
* The clone handles all live traffic during this time.
* Services (for example, Redis) serve both the original app *and* the clone.
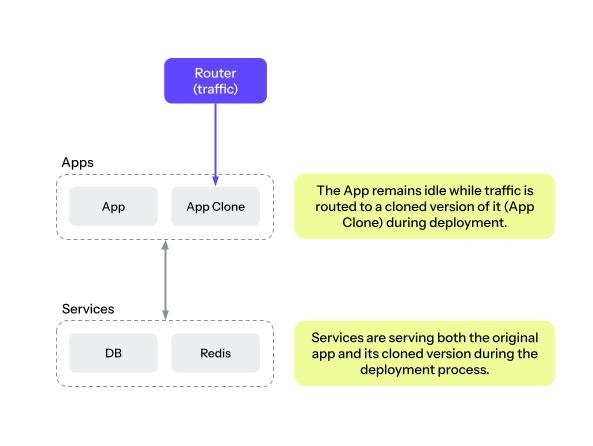 * The original app is updated with the new code and configuration.
* The deploy hook is run on the original app.
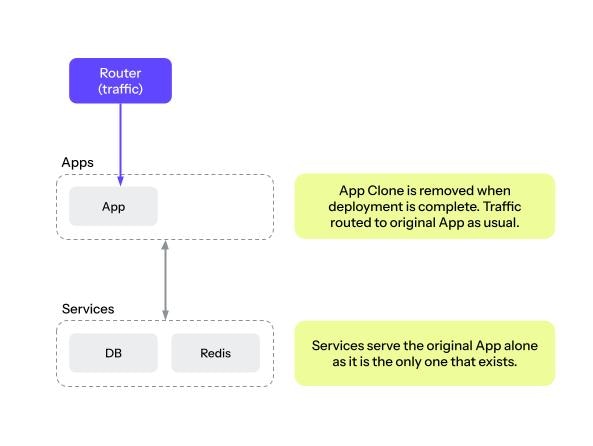
* When deployment of the original app is complete, the clone (the temporary container) is shut down and removed.
* All traffic and services are now applied to the original app only.
* The original app is updated with the new code and configuration.
* The deploy hook is run on the original app.
* When deployment of the original app is complete, the clone (the temporary container) is shut down and removed.
* All traffic and services are now applied to the original app only.
 During a zero-downtime deployment, the original app and its clone run simultaneously short period (a few seconds to a couple of minutes).
**You are billed for extra resources while both app versions active.** If your app’s deployment phase takes longer and uses more resources, expect proportionally higher costs.
### Deployment strategies
#### Stop-start (default)
* Services stop first then restart with the new version
* Deployment is fast but may cause temporary downtime or freezing depending on the application
#### Rolling (ZDD)
* Creates a temporary copy of your services
* Routes traffic to the temporary copy while updating the original services
* Removes the temporary copy once the deployment is complete
* No downtime for users
* Deployment may take longer and use slightly more resources temporarily
### Stop-start vs Rolling (ZDD)
| Feature | Stop-start (default) | Rolling (ZDD) |
| -------------------- | ----------------------------------------------- | ------------------------------------------------------------------------------------------------- |
| **User impact** | Services may be unavailable briefly | Users experience no downtime |
| **Deployment speed** | Fast | Slightly longer |
| **Resource usage** | Standard | Higher temporarily (due to parallel services) |
| **Process** | Stop services → deploy updates → start services | Deploy temporary services → switch traffic → update original services → remove temporary services |
| **Best for** | Small apps, quick updates | Apps requiring uninterrupted availability |
| **Limitations** | Causes downtime/freezetime | Longer deploy time, higher temporary resource use |
### Use cases
| Use Case | Recommendation |
| -------------------------------------------- | -------------------------------------------------------------------------- |
| Code pushes | Suitable |
| Config or environment variable changes | Suitable |
| Stateful service updates (databases, caches) | Not suitable |
| Database schema migrations | Not suitable (unless updates are both backward **and** forward compatible) |
## How to use Zero Downtime Deployments
Before running zero-downtime deployments, it is recommended that you enable [manual deployment](#manual-deployment).
**On code push**
```bash theme={null}
upsun push --deploy-strategy rolling
```
**With Manual Deployments**
```bash theme={null}
upsun environment:deploy --strategy rolling
```
In the Console, navigate to the environment settings and trigger a deployment from the deployment modal. Select Zero Downtime as a deployment strategy.
```
POST /projects/{projectId}/environments/{environmentId}/deploy
{
"strategy": "rolling"
}
```
## Connection handling
During any deployment, long-lived connections like WebSockets or Server-Sent Events (SSE) are dropped.
With ZDD, you can plan for smooth reconnection:
* SSE supports automatic [retry logic](https://developer.mozilla.org/en-US/docs/Web/API/Server-sent_events/Using_server-sent_events#retry).
* WebSocket clients should implement reconnect logic.
## Zero Downtime Troubleshooting
This section covers two common scenarios and how to resolve them.
If the last deployment failed, you can only use the default stop-start strategy.
### Application is slow to start
If your application takes longer to become responsive, traffic might be [switched back to your original application](#how-zero-downtime-works) before it’s fully ready. This can cause temporary errors immediately after deployment.
During a zero-downtime deployment, the original app and its clone run simultaneously short period (a few seconds to a couple of minutes).
**You are billed for extra resources while both app versions active.** If your app’s deployment phase takes longer and uses more resources, expect proportionally higher costs.
### Deployment strategies
#### Stop-start (default)
* Services stop first then restart with the new version
* Deployment is fast but may cause temporary downtime or freezing depending on the application
#### Rolling (ZDD)
* Creates a temporary copy of your services
* Routes traffic to the temporary copy while updating the original services
* Removes the temporary copy once the deployment is complete
* No downtime for users
* Deployment may take longer and use slightly more resources temporarily
### Stop-start vs Rolling (ZDD)
| Feature | Stop-start (default) | Rolling (ZDD) |
| -------------------- | ----------------------------------------------- | ------------------------------------------------------------------------------------------------- |
| **User impact** | Services may be unavailable briefly | Users experience no downtime |
| **Deployment speed** | Fast | Slightly longer |
| **Resource usage** | Standard | Higher temporarily (due to parallel services) |
| **Process** | Stop services → deploy updates → start services | Deploy temporary services → switch traffic → update original services → remove temporary services |
| **Best for** | Small apps, quick updates | Apps requiring uninterrupted availability |
| **Limitations** | Causes downtime/freezetime | Longer deploy time, higher temporary resource use |
### Use cases
| Use Case | Recommendation |
| -------------------------------------------- | -------------------------------------------------------------------------- |
| Code pushes | Suitable |
| Config or environment variable changes | Suitable |
| Stateful service updates (databases, caches) | Not suitable |
| Database schema migrations | Not suitable (unless updates are both backward **and** forward compatible) |
## How to use Zero Downtime Deployments
Before running zero-downtime deployments, it is recommended that you enable [manual deployment](#manual-deployment).
**On code push**
```bash theme={null}
upsun push --deploy-strategy rolling
```
**With Manual Deployments**
```bash theme={null}
upsun environment:deploy --strategy rolling
```
In the Console, navigate to the environment settings and trigger a deployment from the deployment modal. Select Zero Downtime as a deployment strategy.
```
POST /projects/{projectId}/environments/{environmentId}/deploy
{
"strategy": "rolling"
}
```
## Connection handling
During any deployment, long-lived connections like WebSockets or Server-Sent Events (SSE) are dropped.
With ZDD, you can plan for smooth reconnection:
* SSE supports automatic [retry logic](https://developer.mozilla.org/en-US/docs/Web/API/Server-sent_events/Using_server-sent_events#retry).
* WebSocket clients should implement reconnect logic.
## Zero Downtime Troubleshooting
This section covers two common scenarios and how to resolve them.
If the last deployment failed, you can only use the default stop-start strategy.
### Application is slow to start
If your application takes longer to become responsive, traffic might be [switched back to your original application](#how-zero-downtime-works) before it’s fully ready. This can cause temporary errors immediately after deployment.
Use a post\_start command
You can use the `post_start` command to ensure your app is fully active before traffic is routed to it. This command can perform checks or wait until your application starts listening on the expected port.
For example, if your framework needs several seconds to initialize (e.g. building caches or database connections), `post_start` can help coordinate the handover so the app receives traffic only when it’s ready.
An example of a `post_start` command waiting for your application would be:
```
web:
commands:
post_start: |
date
curl -sS --retry 20 --retry-delay 1 --retry-connrefused localhost -o /dev/null
```
**For more information about the `post_start` command, visit [web commands](/docs/configure-apps/image-properties/web#post_start-command).**
### Deployment fails midway
If deployment fails partway through, one of the applications (either the original or the clone) may remain active in the background while the other continues to serve traffic. This can lead to an increase in resource usage and costs.
To troubleshoot a failure, try one or both of the following:
* [Enable manual deployments](#change-deployment-type) if not already enabled; then, try to manually redeploy the application.
* Deploy the environment using the stop-start strategy to ensure no clones remain active.
If you still experience issues, [contact support](/docs/core-concepts/get-support).
## Deployment philosophy
Upsun values consistency over availability, acknowledging that it's nearly impossible to have both.
During a deployment, the [deploy hook](/docs/configure-apps/hooks/hooks-comparison#deploy-hook) may make database changes
that are incompatible with the previous code version.
Having both old and new code running in parallel on different servers could therefore result in data loss.
Upsun believes that a minute of planned downtime for authenticated users is preferable to a risk of race conditions
resulting in data corruption, especially with a CDN continuing to serve anonymous traffic uninterrupted.
This brief downtime affects only the environment being updated.
Deployments to a staging or development branch have no impact on the production environment and cause no downtime.
## What's next
* See how to [configure your app](/docs/configure-apps) for the entire process.
* Learn more about [using build and deploy hooks](/docs/configure-apps/hooks).